Header

To enter our monthly Jewelry Design Challenges Click here! To see the current calendar of events for SRAJD Click here!

To join our Facebook Discussion Group Click here! Check out our current SRAJD Gift Guide

Wednesday, April 1, 2015

March 2015 Soldering and Fusing Theme for SRAJD Jewelry Design Challenge


Before we begin with March, congrats to Rain Hannah for being the randomly chosen winner of all the February submissions.

Rain, here is a list of the prizes accumulated so far. 
 Select your gift from here.  Just msg or email me with your selection choice.

And now.... Our theme for March 2015 was “Soldering and Fusing”.  Click on each artist's name to see more of their work.

Here are the beautiful offerings of the SRAJD members…
 

Kim Forrer: I learned to fuse in the dark so I could get a better feel of the colors the metal was turning. But I continue to fuse in the dark because I love seeing the cool colors....and that perfect moment when your metal looks like mercury. This piece is fine silver that I hand forged and fused into links. I added a white pearl dangle for a touch of elegant femininity.

Darlene Orlowski: I fused the ring using 12 gauge fine silver. I hammered and textured the ring with triskele stampings. I finished the earrings with a cone shaped Connemara Marble bead with sterling wire.

Lindsey Keats: This necklace and earring set is composed of artisan lampwork beads, beautiful rutile quartz onion briolettes and Czech glass accent beads, all wrapped with buffed oxidized sterling silver.
            This set reminds me of water lilies on a spring pond, when everything is fresh and green after a dreary west coast winter.
            The lampwork is from Blue Heeler glass and everything else was wrapped, soldered, hammered by me. The wire, chain and findings are all sterling silver, with a few big fine silver headpins thrown in. 

Mary Rembach: Sterling Silver Circles Necklace - 18 Gauge 11mm fine silver jump rings fused and tumbled, then joined with 18 gauge 3mm jump rings.

Shelley Cole Kuduk (Charlotte): I have named my piece “Rainbows of Light”. I have taken flat lampwork beads, these by the talented Jane Harter and used traditional stained glass methods, in this case The Tiffany foiled glass method of foiling each piece of glass and for the assembly of the piece I have soldered it together with a soldering iron used on the traditional wood board. I used wood so that I might nail the items to the board so they should stay within the pattern and not move when being soldered. The finished piece if completed with a hand made chain featuring Jane’s beads, and the piece is liberally sprinkled with Swarovski crystals.

Barbara Swinton: I wanted to do something with a minimalist look to start practicing my soldering, and like the look of mixed metals. This set combines sterling discs with a brushed finish and red brass which I textured with my new cross peen hammer. Sweat soldering with a micro torch is about as basic as soldering can get, but getting things to stay centered is still a challenge for me. Added a simple sterling bail soldered only on the back... Looking forward to advancement:)

Michele Dodge: I was inspired by this beautiful freeform malachite cabochon, cut by local lapidary artist Ed Orekar. The stone itself dictated the shape of my finished pendant, and the start of spring inspired my leafy motif, front and back. The techniques involved include soldering and saw-piercing sterling silver.

Tina Richter: This pendant was actually going to start out as a butterfly. As the main part of the body was in the pickle pot I started playing with the swirls. Before I knew it they were all soldered together in became this pendant. As for the butterfly well lets just say landed on my bench for now.
            This is 18 gauge sterling silver wire and the stones are Green mountain jade and black onyx.

Laura Bracken: This is an “end of day bracelet”.  I took copper and silver scraps leftover from my workbench and fused them into an abstract collage.  Then I soldered that onto a cuff I formed out of thick copper wire.

Laura Bracken: To make this pendant I used a jeweler’s saw to cut out the petroglyph (cave painting) shape then soldered it onto a disk I’d run through the rolling mill (for texture).  The final step was riveting a bail at the top.

We hope you’ve enjoyed looking at these wonderful creations. Make sure to check out the other monthly challenges. 

If you’d like to get in on the action, join the SRAJD organization. If you’re already an active member, submit your jewelry challenge piece here for the current month . 

Thursday, March 26, 2015

SRAJD Week 6 Topic BLOGS


Laura Bracken: Let's start the week by reminding everyone of our great SRAJD blogroll. Can you imagine how much useful and fun information is to be had from the pages on this list? http://www.artisimportant.com/SRAJD/blogs.htm

Tammy Adams: How often do you all post new content for your blogs? I aim for once a week, sometimes twice if there's a design challenge or blog hop.

Laura Bracken: I try to blog every 2-3 days. I like to keep my readership around the 500 a day or higher mark and that seems to help.

Helen White: I tried to aim for 1 post a week, but my health has been so bad the last three years that I can't physically do this. I also have a different website with blog attached which I have neglected, but I just can't find time or energy. Now I am trying to blog when I feel like it and the pain is manageable.

Tammy Adams: Laura, what tool do you use to track readership?

Laura Bracken: I have stats on the Blogger dashboard and I also use http://statcounter.com

Nohline L'Ecuyer: This is where I stumble. I started a blog; have several posts written but need to find the photos to attach.

My blog is through my webpage (new) on indiemade. Can you attach this stat counter to that. I think I may have it on Blagger,but not sure. How do you get followers? I have a lot of questions on this subject.  Do you write your blog post with photos in a word doc and then just paste it to your post?

Laura Bracken: If you get the code from StatCounter (easy-peasy), you can ask the IndieMade admin to add it to your blog page. As to how I get followers, I don’t think I do anything special that I can think of. I try to be “out there” in the social media world and when someone mentions something or has a question on a topic I’ve covered in my blog, I post a link. I used to write my posts in WORD (but not with photos) and then paste to blog, but lately I just write it straight in my blog.

Tammy Adams: I compose my posts from the blog dashboard most of the time, Nohline. Sometimes I start a draft document in a word processing program, especially if ideas come to me when away from my blog dashboard. In either case, I insert parenthetical notes about images to remind me to grab a photo.

This is a nice post about audience size. It sort of goes with the idea of writing for one person. Which is good basic advice for authors on any platform. http://www.alexandrafranzen.com/.../21/you-are-a-big-deal/

Nohline L'Ecuyer: Oh that's wonderful Tammy! Thank you and it applies to so much more than just a blog!

Tammy Adams:  Here's another question: what do you blog about? Most of my posts are about what I call my creative adventures: designing new pieces, trying new techniques, blog hops. Occasionally I share some tips, but I haven't done any formal tutorials.

Laura Bracken: I have two blogs, Tammy. One is me babbling about everything, some of which happens to be jewelry related. Then I take the useful jewelry info and put it in the other "all business" blog. My "babbling" blog gets 500 hits a day... way way WAY more than my all business blog.

So I think posts about just want you mention would be great... your design inspirations, attempts at new techniques, etc.

Carol (Britt) Clay: I post on my blog more seasonally and in a staggered pattern, mainly due to time constraints and listing groups of items. I also stagger (not only) posts about my items, but in between my posts, I write about other shops too. They're what I call "shout outs" and I also promote Collection/Treasury posts where I use a method of visualizing an actual trip there on my magic carpet.....(ok, sounds corny, but I love visualizing things). Once at someone's shop, I wander through and focus on items they sell, as a promo. I also add my own item at the end of each treas/collection (because I was also featured too, so why not)?  I am now listing about 25 new items so I expect to be making a new blog post afterward...

Laura Bracken: Decent, straight-forward advice. I follow all these rules except #6  Getting past the annoying pop-up on that site took me a second or two... ugh http://www.entrepreneur.com/article/232478

Since blogging is such a huge social media path, I thought we'd have more conversation on the topic. Is everyone happy with their blog or lack of blog? No questions, thoughts, ideas, rants?

Tammy Adams:  I wouldn't say I'm 100% satisfied with my blog. It's only a little over 1 year old, and I'm still learning things. I'm not sure who I want to be my "target audience" for my blog, just as I am still working on defining the target market for my jewelry. I'd say most of my readers are other jewelry designers, partly because I regularly participate in design challenges and blog hops. I'm curious how other bloggers recruit readers.

Laura Bracken: I don't recruit, but I do refer to past blog posts in social media when relevant.

Tammy Adams:  That's sort of my raison d'etre for blogging, too, Laura.  I try to write shorter posts and so far have not succeeded. But I do at least sprinkle photos liberally about the text.

Bonnie Jacobsen: I love blogs and don't have one.

Laura Bracken: I don't see the point to having one unless you WANT one and/or need one, I guess. Apparently I ramble and babble and feel the need to yap constantly.

Bonnie Jacobsen:  I love your blogs Laura. I am disappointed when you don't do them.

Laura Bracken: Really Bonnie? That's so awesome to hear. My next blog post will be about my adventures on Valentine's day. 

Sonia Davis: I have thought about a blog and probably even started one and never went back to it........I now need to justify to my husband and family my reason for wanting to do this full time....So I guess I will start blogging.......how do you do it all.....create, design, family, social media, marketing....etc. i commend everyone who is able to keep up....I am trying one step at a time.

Helen White: I have two blogs, one for my journalism site and one for the jewellery website. I tried to post once a week on the latter but couldn't keep it up for health reasons. I tend to come up with topics spontaneously rather than planning it all.

Monday, March 2, 2015

February 2015 PATINA Theme for SRAJD Jewelry Design Challenge

Before we begin with February, congrats to Donna Jo Wallace for being the randomly chosen winner of all the January submissions.

Here is a list of the prizes accumulated so far.  Select your gift from here.

And now.... Our theme for February 2015 was “PATINAS”.  Click on each artist's name to see more of their work.

Here are the beautiful offerings of the SRAJD members…

Kim Forrer
Achieved this pretty verdigris patina by leaving the cuff out in the fog for a few days then used a vinegar/salt bath and airdry. I love the look of old copper colored by age and the elements.

Kim Forrer
The colors on the copper in this bracelet were inspired by the lovely Turquoise chips linking the squares. And also my love of ocean colors. I used a combo of layering inks and acrylics to achieve these great patterns.

Marcia Tobolsky
I decide to created some wrap earrings for valentines besides others items that I been silver wrap stones, this is moonstones beads and pearls with the lever back cooper earrings.

Kim Forrer
Colors achieved with my torch. Took about 5 minutes of passing continual flame across the cuff. Then sealed to help preserve the colors.

Kim Forrer
I layered acrylic paints and alcohol inks to color this brass cuff. Inspired by a dress I loved back in the 70's.

Marcia Tobolsky
I used copper wire the earrings shows the time, natural oxidation with glass beads and hematite stone this design.

Tammy Adams
Metal washers given a faux copper patina with Ice Resin Enamels. Connected with dark oxidized copper jump rings. Earrings are on natural copper ear wires, which will develop their own patina over time.

Barbara Swinton
This is the first patina I have tried that is not LOS. A friend shared her recipe, which included white vinegar, ammonia and salt. I really like the finished look - very rustic. Love the dab of red on one of the earrings. Scrap pieces of 22g copper sheet and some 10g copper wire were used to create the basic design...but the patina is what really makes them unique. I applied a renaissance wax finish which gave the patina more contrast. Certainly this recipe will be used again:)

Carol Evans
I love creating patinas..... Transforming raw metal into pieces with texture and dimension. I used a combination of heat treatment, reactive metal patina and wax to give these earrings an aged patina in a deep hunter green with warm brass highlights.

Debbie Brown
These earrings were inspired by gorgeous Spanish black lace. I took shiny gold brass medallions and added a patina to them. The finish has a sealer on them, and they hang from sterling silver ear wires.

Rain Hannah
I call these "Mermaid Trinkets" -t hey are a traditional verdigris patina over domed, distressed and textured copper discs. I used the Sculpt Nouveau product for these. Basically the flat discs were annealed, I pounded the heck out of 'em with a texture hammer, then annealed again, then domed, then bent the domes a bit with pliers around the edges, then hit the domes with a hammer a little more... it was very therapeutic! Once they were textured the way I liked, I used the Sculpt Nouveau product - it took about 48 hours to get the "bloom" where I wanted it, but once it was there, I sealed the discs thoroughly with Permalac and then some Renaissance wax.
        I've had the mauve stick pearls in my stash for about 4 years, and hadn't found a use for them yet, but they went really well with the green patina so I knew I wanted to pair them together. Ditto the peach pearls, which I bought around the same time. I was trying to use up old materials for this project. I did throw in some Czech crystal for a little sparkle.
        Using the stick pearl to anchor the top of the design reminded me of a pagoda shape, so I decided to play around with the idea a little more. I was really happy with all of the variations I came up with, so I'm doing a little mini collection around the theme. There is a necklace in the works, to match.

Kelly Hosford Patterson
I'm working on an assemblage art necklace with an old grungy tin as the focal. I looked everywhere for salvage supplies to go with it, but couldn't find the look I wanted at a salvage price. I really wanted pieces that looked like they were once very fancy, a very long time ago. Ancient looking gold, pearls, and rhinestones, etc. So I handmade some fancy chain links, and experimented with making them look very old and grungy. My chain is made out of brass wire. It's craft wire, so it has a lacquer coating to protect the shine. First step was removing the protective lacquer. I soaked it in nail polish remover until the coating started to soften and then rubbed it to break it up. It started to flake off, but not completely, which worked out perfectly for my purposes. I then dipped my chain into a black patina solution (Nitric Acid & Selenium Dioxide), to darken the unprotected portion of the chain. The results are perfect for my project. 50 year old chain in less than a day!

Catherine Shattuck
These lovely "spoon" earrings were originally raw brass. The colorizing process that I used to achieve this look is done in several steps. First, after cleaning them, I paint the spoon stampings with a white acrylic base, then painted over that with a very light blue acrylic paint. To give them the patina affect I mixed brown umber acrylic paint with glaze and applied it along the edges, then rubbed it off right away, leaving a tinted edge that makes the pieces look aged. I really enjoy colorizing many of my designs now and have learned a lot about this and other patina processes within the past few years.

Catherine Shattuck
I gave this sweet little pair of earrings a shabby look by coloring with several layers of a chalk white paint, rubbing them out after each layer. Finally, I sealed them to protect the finish. They are embellished with poly clay flowers and Czech glass leaf beads.


Donna Jo Wallace
Niobium spiral wave bracelet, anodized peacock blue. Anodized niobium has not been plated or dyed with any other metal. It is still pure allergy-safe niobium all the way through. All niobium jewelry in my shop is anodized in-house on my own equipment. The color is not flat, but is brilliant with slight impressions of other colors as you turn it in the light. This bracelet is 8.5 inches (21.5 cm) long. Handmade by Naturally Nickel Free.

Carol Priestley
Earrings - Red Copper Oxide Patina (Grilled Borax)

Laura Bracken
These are bronze earrings with a non-chemical heat patina.

Laura Bracken
And just finished these so I'll slip them in here.  Both copper and liver of sulfur.  For the bracelet on the right, I stopped the patina at the red stage (which was pretty wild before I coated it with Ren wax).  Then I re-buffed the edges for contrast.  For the larger cuff I gave it a darker patina then just buffed lightly with steel wool.


We hope you’ve enjoyed looking at these wonderful creations. Make sure to check out the other monthly challenges.

If you’d like to get in on the action, join the SRAJD organization. If you’re already an active member, submit your jewelry challenge piece here for the current month .


Sunday, February 15, 2015

SRAJD Week 5 Topic PATINAS


Laura Bracken: I'll start things off by sharing a blog post I wrote a few years ago on the subject.

Barbara Swinton: Love your experiments. Looking forward to this month. I've only used LOS and some bottled patina for copper, brass, bronze. From me few results and after reading your blog piece, I have a new respect for pre-cleaning. To date I've just used dawn and a toothbrush. Sometimes that works...except when it doesn't!

Laura Bracken: LOS is my "go to" patina for 99.9% of everything. But it is fun to experiment with other things once in a while.

Barbara Swinton: Is swellegent considered a patina? I remember Carol Evans showed us some pieces with that and I thought the effect with copper was nice.

Laura Bracken: Barbara, you bring up a good point. I, personally, don't think of coating colors as patinas but it's a gray area. Perhaps there is no real line between coloring metal with something like paint or color pencils versus coloring metal by liver of sulfur or oxidation. [ETA: I have since learned that there are Swellegent coatings and and Swellegent patinas].

Laura Bracken: On another note, here's a fun Pinterest board.

Nohline L'Ecuyer: I just got a new patina. It is by Fischer, German, and is called Oxidbeize Gosiba. It apparently makes a really dark black on silver and does not patina gold. So I am going to try it on some keum boo this weekend.

Tammy Adams: From my research, the Swellegant patinas are chemical patinas similar to LOS, not a paint. They achieve the effect via a reaction that develops over time, and you can stop the reaction at any point in the process, same as with LOS. Also, they reportedly work differently on different metals. They also have dye oxides to enhance the patinas, or use on their own.

Tammy Adams: For this month's challenge designs, Laura Bracken, are we limited to chemical patinas? Are heat patina effects included? Faux patina using pigments?

Laura Bracken: I say any patinas.

Carol Evans: Swellegant makes a line of metal patinas and they do react with what ever metal you are using. These are not coatings or paint. I really like them. Easy to use and good results each time.

Tammy Adams: Just re-read your article, Laura. The caution about not adding water to acid reminded me of the mnemonic I learned in high school chemistry: do what you otter, add acid to water.

Carol Evans: I love to create patinas on my metals. I feel like a mad scientist . I rarely use measurements or "recipes".... Usually just wing it. One day you will hear a loud bang and see lots of smoke coming from my laboratory... I mean work table . May not have eyebrows but I will have created a hell of a patina on my piece.

Diana Brandt: Do you consider alcohol inks a paint or patina? I bought a bunch over the summer and played around with them. I wasn't really impressed with their effects and durability. Maybe I didn't do it right.

Laura Bracken: Diana, I've decided not to try to define patina (for myself and/or for the monthly challenge). BTW, here's something I made in welding class using alcohol inks and steel.


Diana Brandt: Nice Laura. Did you heat treat it? I've read that you are supposed to "set" it by heat treating it. But I really don't want to put this stuff in my oven.

Laura Bracken: I did not. I did spray it with fixative, but I probably didn't need to.

Tammy Adams: I've put alcohol inks in my oven on many occasions with no ill effects, Diana. I use it frequently with polymer clay. Never noticed an odor, etc. They're just pigment in an alcohol carrier. You can also heat set with a heat gun, if you want to speed up the drying process.

Laura Bracken: How many of you have tried any of the SculptNouveau patinas?

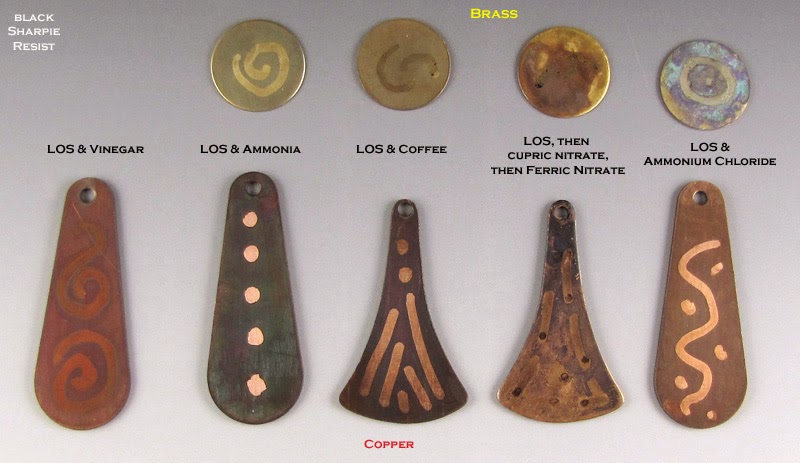
Laura Bracken: Who's done the salt and vinegar patina? If so, how many days did you wait? (JewelryMakingJournal photo... see link for article)

Donna Warriner: I did the fuming with salt and vinegar and I believe it was a total of 2 days. I spritzed every few hours with sea salt and water. I've tried so many -I have lost track. Lol I buried in corn cob, fumed, and with ammonia and vinegar

Laura Bracken: Sounds like fun, Donna! Do you have any photos you could post here to show us the results?

Marica Zammit: I've only used Swellegant so far. Love it. I now want to try torch patina and also salt & vinegar. I've also heard great things about Sculpt Nouveau. I could patina all day if I could lol

Tammy Adams: I love the look of the salt and vinegar potato chip patinas. But it seems like an awful waste of tasty potato chips.

Marica Zammit: Oh and I use Gilders Paste a lot but I don't think that's considered as a patina?

Laura Bracken: Marica, that's great to hear about Swellegant. I'd love to see you post some of your guilder's paste work in this thread. I have some but haven't used it well yet.

Ann Sanicola: I use many of the Sculpt Nouveau patinas. Love them!

Kim Forrer: Laura I did the salt and vinegar thing. Posted info yesterday in our FB page.

Kim Lyons: Does anyone know if extreme temps will affect the result or timing? We are headed for single digits, but I would love to try this weekend and will have to have it outside. Specifically the ammonia recipe

Laura Bracken: Kim, that's a good question. I couldn't find any info on it so you'll have to let us know how it turns out.

Carol Evans: These are a pair of brass earrings. I first heat treated, sanded off areas, coated with the swellegant darkening patina, then the swellegant gold verdigree patina. Let dry, then used a bit of patina gilders paste and finally sealed with ren wax. Love the finish.

Carol Evans: Here is another pair of earrings made using swellegant. All sealed with ren wax.

Laura Bracken: Lovely work guys! Carol, other than for earrings, do you advise your customers that ren wax will eventually wear off (necklace pendants, bracelets, and rings)?

Carol Evans: Yes. I state it will wear and should be reapplied every so often to keep patina and sheen. If not.... Metals will naturally patina with age.

Laura Bracken: Thanks Carol. I always wonder about that stuff. Rain, that's great to hear. Got any photos? I'd love to see the results. I think I even have some that I haven't tried yet.

Rain Hannah: I've tried the Sculpt Nouveau green patina, traditional verdigris. Liked the results very much on both copper and bronze. It blooms nicely!

Tammy Adams: I don't have any awesome photos to share of "real" patina because I haven't done much with the chemical stuff. Yet. But last year I used Iced Enamels with resin to grunge up a key and some washers for our "Road Warrior/Post Apocalyptic" challenge.

Laura Bracken: What a cool technique, Tammy!

Rain Hannah: MsFickleMedia on Etsy repackages Sculpt Nouveau patinas - trad, and dye oxide - and wrote up a pretty clear, easy to follow "how to" about using them. I have it and it's been pretty useful.

Mary Rembach: Sorry if this has been covered, I haven't read everything yet, I just finished a copper necklace. I used LOS on it. I use a pro polish pad to remove what I want from it, but how can I tumble it without removing all of the patina? And, what prevents the patina from getting on customer's skin, clothes, etc.? It seems awfully easy to wipe away. Am I doing something wrong? Skipping a step? I do submerse it in baking soda and water as a last step. Oh, and how can you get Ren wax on and then off all of the grooves in a wire necklace? I guess I have 3 questions here.

Laura Bracken: You would pull it out of the tumbler every so often until it's what you want. If patina is poorly applied it can indeed get on customers clothing. When you dunk in LOS, do you do a quick dunk, then rinse, then a little longer dunk, then rinse, then longer dunk, etc?

Mary Rembach: Aha - I have not done that, because it turns black so fast. Maybe I need to use cooler water and keep repeating. Do you use separate shot your copper?

Laura Bracken: Never let your piece turn black fast... that is a coating, not a patina. As for tumbling, I have separate shot and separate barrel for base metals and for silver.


Mary Rembach: Oh boy!! - does anyone have a link they recommend for reading the proper way to patina using LOS?

Laura Bracken: Mary, click here.

Barbara Swinton: If I'm tumbling to work harden or clean/shine, I do it before LOS....then when I get the right color from my LOS, I am currently sealing with renwax, but Mary, I've never used wax on a chain necklace. I do have a lacquer product (bottle) from Rio, that I dip chain into to preserve patina color...that would work better than ren wax.

Barbara Swinton: Laura, I have put base metals and silver in the same shot...forever...no patina....is that bad? If so, what's the scoop?

Laura Bracken: Barbara, I also used to use one tumbler for everything. I don't think it's a big deal at all. I just prefer to keep them separate when possible... in case.

Mary Rembach: Laura and Barbara - I wonder how I got this patina - I think I always use the same process - but this one is an even deeper brown than the picture shows - I just fly by the "seat of my pants" mostly. This was deepest brown I ever got. Just copper wire in LOS.

Laura Bracken: I just added LOS to one my chainmaille bracelets too this week!

Kim Forrer: Laura what pattern is that one? I want to attempt a chainmaille bracelet for myself. I like that pattern. Not sure my eyes can stand it though. Probably take me a year......

Laura Bracken: Byzantine... but those are tiny... I don't advise using small jumprings. Took me several bracelets before I got the hand of it.

Mary Rembach: If it's your first attempt at Byzantine - use 16 ga. 4.5mm rings. Laura's is probably 18 ga. 3.5mm. The larger rings make it easier.

Barbara Swinton: Mary, your sizes are ring ID, right? Byzantine is my favorite weave:)

Mary Rembach: Yes Barbara - ID. There's a chainmaille group on here I recently joined and they use imperial measurements instead of metric. I learned chainmaille using metric measurements and it drives me crazy trying to convert their measurements. I always have to refer to a chart.

Barbara Swinton: Do you make new LOS each time? I have a can of pieces which I think will last me the rest of my life but to keep creations from turning black quickly (that happens to me sometimes...not always) do you just add a spec of LOS. I never measure anything...just chip off a piece and add about 1/2 cup water and microwave for about 10 secs....maybe I Should measure to be more consistent in my results....what do you do??

Laura Bracken: I don't use the chunks anymore. I use the one shown in the topic photo. So yeah, I make it up fresh each time (I only use a couple drops of the stuff at each sitting). I don't measure. But I don't measure when I cook either, so that's probably just a personality thing.

Mary Rembach: I use the liquid LOS I also got from Cool Tools and use just a drop or two.

Tammy Adams: I love the colors of rusted, weathered, oxidized metals. And I hate polishing jewelry. So patinas are right up my alley. I have learned so much in the past year from this group, including the fact that patinas can wear off if not sealed. Definitely a "good to know" thing.

Nohline L'Ecuyer: I just found this on Pinterest, but the link doesn't give any recipes.

Marica Zammit: Sorry for not getting back to you sooner Laura. Crazy busy right now. Here are some pieces I'm working on where I used gilders paste. They were all raw brass before I started playing with them.

Laura Bracken: Cool, Marica! Thanks for posting!

Kim Forrer: Also didn't see anyone mention this but LOS in chunk form will go bad if exposed to too much heat orw freezing temps, which is why . switched to gel when it came out,

Laura Bracken: And never get it near moisture... ever!

Barbara Swinton: Laura, is there just one entry/person for the challenges? Any room for multiple pieces in one photo?

Laura Bracken: You may enter as many per month as you like so long as they fit the theme. Personally, I think more than 3-4 is overkill, but I'm not being a stickler. If you want to show more than one view of an item (or multiple items) by creating an image collage, that's up to you, but I resize all photos to 800 pixels on the longest edge so keep that in mind.

[Anything posted after the end of that week will remain in Facebook and won’t be transcribed here.]